When output is displayed in graph view, you have the option to define formatting for select elements of the graph. You first specify the grid element and characteristic being formatted and then the format settings to be applied. The graph formatting options are available from two access points as follows:
· Format Toolbar - toolbar icon buttons that provide direct access to selected formatting options for the grid
· Format Graph dialog - dialog window that provides access to all formatting options for the grid
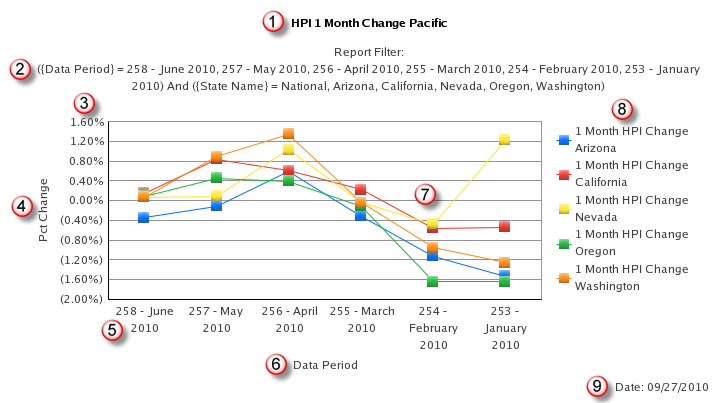
When you format a graph, you should be familiar with the elements of the graph. These are as follows:
![]() Graph
Title - by default uses the Report Name but may be changed in Advanced
Formatting
Graph
Title - by default uses the Report Name but may be changed in Advanced
Formatting
![]() Graph
Subtitle - by default is blank but may be changed in Advanced Formatting
Graph
Subtitle - by default is blank but may be changed in Advanced Formatting
![]() Y
Axis - the axis that provides the metric series value breakpoints
Y
Axis - the axis that provides the metric series value breakpoints
![]() Y
Axis Title - by default is blank but may be changed in Advanced Formatting
Y
Axis Title - by default is blank but may be changed in Advanced Formatting
![]() Category
(X) Axis - axis that provides the attribute value for time horizon
Category
(X) Axis - axis that provides the attribute value for time horizon
![]() Category
(X) Axis Title - by default is blank but may be changed in Advanced Formatting
Category
(X) Axis Title - by default is blank but may be changed in Advanced Formatting
![]() Series
Plotlines - plot line for the metric series (in this example a Vertical
Line graph was used)
Series
Plotlines - plot line for the metric series (in this example a Vertical
Line graph was used)
![]() Series
Legend - the legend for each metric series that is plotted
Series
Legend - the legend for each metric series that is plotted
![]() Footnote - by default is blank but may be changed in Advanced Formatting
Footnote - by default is blank but may be changed in Advanced Formatting

The Graph Format toolbar provides direct access to the formatting options available when displaying the output in graph view. The toolbar options require you to select the grid element(s) to be formatted and the toolbar options enabled will be dependent on the selection. The following options are available from the Format toolbar:
![]()
Icon/Field |
Description |
|
This drop down list allows you to select the type of formatting being applied. The drop down list includes options for Format, Titles, Axes or Series Colors. You select the graph element to be formatted. |
|
Once you have selected the type of formatting, you must specify the graph element being formatted. The elements in the drop down list are specific to the type of formatting being applied. When Format is selected, you may define formatting for Text, Background, Frame, Legend or Legend Area. When Titles is selected, you may define formatting for All Titles, Title, Subtitle, Footnote, Category (X) Axis Title or Y Axis Title. When Axes is selected, you may define axes label formatting for All Axes, Category (X) Axis or Y Axis. When Series Colors is selected, you may define the color for each of the series that are plotted on the graph. |
|
When enabled, the font settings allow you to specify the font to use and the size of the font. |
|
When enabled, the font format settings allow you to specify if the font is presented as bold, italic and/or underlined. These settings are independent of one another and each are applied to the specified grid element and characteristic being formatted. |
|
When enabled, the background color option allows you to define the fill color for the specified element of the graph. The drop down list provides a predefined palate of colors with access to an advanced dialog to define a custom color. You may also enable two colors and a style for gradient color formatting. |
|
When enabled, the line color option allows you to define the color of the border for the selected graph element. The drop down list provides a predefined palate of colors with access to an advanced dialog to define a custom color. |
|
When enabled, the text color option allows you to define the color of the text for the selected graph element. The drop down list provides a predefined palate of colors with access to an advanced dialog to define a custom color. |
|
When viewing Grid and Graph, the advanced grid formatting option allows you to open the Advanced Formatting dialog which provides additional control over the formatting of the selected grid element and characteristic. Refer to the Advanced Grid Formatting Dialog section for more information on the tabs and options you can define. |
|
The advanced graph formatting option allows you to open the Advanced Graph Formatting dialog which provides additional control over the formatting of the graph elements. Refer to teh Advanced Graph Formatting Dialog section for more information on the options you can define. |
The Format Graph dialog provides advanced formatting options for the graph layout. This dialog includes options to define:
· General - options to specify the type of graph
· Format - options to specify the formatting of elements on the graph
· Number - options to specify the formatting of numeric values
· Axes - options to specify the formatting of axes values and scaling
· Advanced - options to define the basis for the plotted series and the sizing
The General options allow you to specify the type and sub-type of graph to be used for plotting the data as well as details of the categories and series to be presented.
|
This option allows you to select the Type and Sub-Type for the graph. The graph types available for selection are itemized below. Each graph style has a specific set of sub-types and requirements for data elements to render a graph
|
|
|
Maximum values must be defined for Categories (the count of Y access plot points) and Series (Plot lines for graph). You may also specify parameters for the plot line to indicate if a curved line is used in line and area graphs and if rounded effect is applied to all series. The font anti-aliasing sharpens fonts in zoomed images. |
The following table provides a list of the graph types available in REAS and the minimum data elements required to render a graph:
Graph Style |
Minimum Requirements |
Area |
One attribute, one metric |
Bar |
One attribute, one metric |
Line |
One attribute, one metric |
Pie |
One attribute, one metric |
Scatter |
One attribute, two metrics Note: If there are more than two metrics, the graph may not be useful because scatter graphs are used to plot two values at a time. |
Polar |
One attribute, two metrics |
Radar |
One attribute, one metric |
Bubble |
One attribute, three metrics Note: If there are more than three metrics, the graph may not be useful because bubble graphs are used to plot two values (a first and second metric) at a time. The third metric is represented by the size of each bubble. |
Stock: Hi-Lo |
One attribute, two metrics Note: To ensure that this type of graph displays data correctly, the metrics must be of the same data type and must be in the following order: low value metric, high value metric. |
Stock: Hi-Lo-Open |
One attribute, three metrics Note: To ensure that this type of graph displays data correctly, the metrics must be of the same data type and must in the following order: low value metric, high value metric, open value metric. |
Stock: Hi-Lo-Open-Close |
One attribute, four metrics Note: To ensure that this type of graph displays data correctly, the metrics must be of the same data type and in the following order: low value metric, high value metric, open value metric, close value metric. |
Histogram |
One attribute, one metric |
3D: Risers |
One attribute, one metric |
3D: Floating |
One attribute, one metric |
3D: Connect Group |
One attribute, three metrics |
3D: Connect Series |
One attribute, one metric |
3D: Surface |
One attribute, one metric |
3D: Scatter |
One attribute, three metrics |
Gauge |
One attribute, one metric |
Funnel |
One attribute, one metric |
Pareto |
One attribute, one metric |
Boxplot |
One attribute, exactly five metrics Note: To ensure that all five sections of the boxplot (minimum, maximum, median, lower quartile, upper quartile) appear correctly on the graph, the five metrics must be defined in a specific order as follows: minimum value metric, low value metric, base or median value metric, high value metric and maximum value metric. |
Gantt |
One attribute, two metrics |
The Format options allow you to define the font style, size and color as well as the fill and line colors for select graph elements. Additionally, you may enable and define the title, sub-title, axes titles and footnotes for the graph. When adding text for the titles, there is an Information button () that provides a list of variables that you may insert to extract text from the report definition or details from the report request (e.g., there is a variable {&REPORTNAME} that will insert the name of the report in any of the text-based fields for a graph). The list of variables are noted below. These variables may be used to define the text for the following graph elements:
· Title - text field that displays above the graph
· Sub-Title - text field that displays beneath the Title and above the graph
· Y Axis Title - text field that displays next to the Y axis value markers
· Category Axis Title - text field that displays next to the category (X axis) value markers
· Footnote - text field that displays in the bottom right corner beneath the graph
|
Select the format option and graph element whose font and (if applicable) text you wish to define.
|
|
|
If working with titles, the Show checkbox will toggle the title field on and off for display on the graph. You may enter free-format text or selected one or more system variables to populate the title/footnote text. If working with a metric element of the graph, the Show checkbox will toggle the plotted values on and off for display on the grid. Additionally, you may toggle the tooltip on and off. A tooltip is displayed when you move your mouse over the plot point or plotted line. This allows you to define a variable and/or add custom text that will display in the tooltip. By default, this will use the variable {&TOOLTIP} which will display the name of the metric across the entire plotted line and add the value of the plot point when you mouse over the plot point. |
|
|
When working with a text element of the graph, you may define the font, style and size to be applied. |
|
|
When working with a text element of the graph, you may define the additional effects and color applied to the text. This field provides a predefined drop down color palette with access to define a custom color. A sample of the text settings is then provided. |
|
|
You may define the fill color and the effects of the fill for the graph element. This field provides a predefined drop down color palette with access to define a custom color. The effects will provide a textured area for the grid element (e.g., chiseled, sphere). |
|
|
You may define the color of the border line for the graph element. This field provides a predefined drop down color palette with access to define a custom color. |
The following is the formatting options available by selection:
Formatting Option |
Formatting Sub-Option |
Formatting Options Available for Selection |
Format |
All Text |
Font Format and Font Effects |
|
Background |
Fill Color, Fill Effects and Line |
|
Frame |
Fill Color, Fill Effects and Line |
|
Legend |
Show checkbox, Font Format, Font Effects, Fill Color, Fill Effects and Line |
|
Legend Area |
Fill Color, Fill Effects and Line |
Titles |
All Titles |
Font Format and Font Effects |
|
Title |
Show checkbox, Font Format, Font Effects, Fill Color, Fill Effects and Line |
|
Subtitle |
Show checkbox, Font Format, Font Effects, Fill Color, Fill Effects and Line |
|
Foonote |
Show checkbox, Font Format, Font Effects, Fill Color, Fill Effects and Line |
|
Category Axis Title |
Show checkbox, Font Format, Font Effects, Fill Color, Fill Effects and Line |
|
X Axis Title |
Show checkbox, Font Format, Font Effects, Fill Color, Fill Effects and Line |
Axes |
All Axes |
Show checkbox, Font Format, Font Effects |
|
Category Axes Values |
Show checkbox, Font Format, Font Effects, Fill Color, Fill Effects and Line |
|
X Axes Values |
Show checkbox, Font Format, Font Effects, Fill Color, Fill Effects and Line |
Series Colors |
One for each metric plotted on graph The options here will be dependent on the type of graph. If there is a plot point and line, there is a color format for each plot element for each metric. If there is a single bar marker, there is one format for each metric. |
Fill Color and Line |
Series Values |
All Data Values |
Show checkbox, Tooltips checkbox, Font Format, Font Effects, |
|
One for each metric plotted on graph |
Show checkbox, Tooltips checkbox, Font Format, Font Effects, |
The following is a list of the variables available for selection to populate text in any of the graph titles and/or footnotes. You may use any combination of these variables in one text related field:
Variable Name |
Description |
{&REPORTNAME} |
Name of the report as saved |
{&REPORTDESCRIPTION} |
Description of the report as saved |
{&CREATIONDATE} |
System date for when the report was created |
{&CREATIONTIME} |
System time for when the report was created |
{&PROJECT} |
Name of the project where the report resides (REAS) |
{&USER} |
Name from the user account that requested the report |
{&PROMPTn&} |
Answer from the nth prompt used to generate report output |
{&PROMPTDETAILS} |
Answer for all prompts used to generate report output |
{&EXECUTIONTIME} |
System time when the report was requested |
{&FILTERDETAILS} |
Report filter details used to generate report output |
{&PAGEBYDETAILS} |
Page By selections used to generate the current view of the output |
{&GROUPLABEL} |
Text value for the plotted category marker (only displayed for plot point and not plot line) - only available when formatting the Tooltip for the Series Values |
{&SERIESLABEL} |
Text value for the plotted series (displayed for both the plot point and plot line) - only available when formatting the Tooltip for the Series Values |
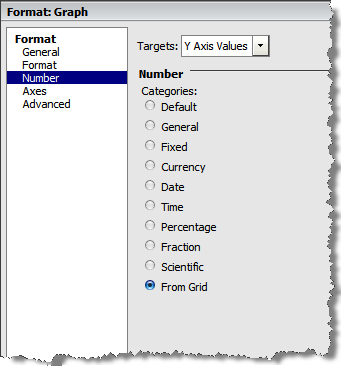
The Number options allow you to define the numeric formatting for graph axes values. In REAS, metric formatting is inherited from the metric definition but the axes formatting can be modified. When you select a metric, the selection options are disabled and displays the formatting inherited from the metric. When you select the graph element to be formatting, the current format option is selected. It is not recommended that you modify the numeric formatting of the values on the graph.

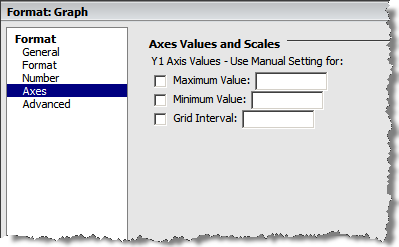
The Axes options allow you to define the minimum and maximum values for the metric value (X) axis as well as the scale of the values (incremental values between plot points). By default, the Y axis and interval values are determined by the metric values being plotted but may be modified using these formatting options. You must first check the axis value you wish to define then specify the value. Modifying these values will affect the display of the plotted metrics and may result in plotted values outside the maximum and minimum values you have specified for the axis.

The Advanced options allows you to define the source of the series being plotted based on either the row or column values in the grid report. In addition, you may define the graph element resizing based on the size of the graph (i.e., as you adjust the size of the graph, do the elements retain their formatted size or scale relative to the size of the graph).
|
This option allows you to select the source of plot points for the X axis. You may specify the values by Row or Column from the grid view of the data.
|
|
|
The Resizing options allow you to specify if the graph elements are resized as the graph is resized to fit in the size of the browser window. The Show Subtotals checkbox will toggle subtotals on and off for those metrics that are accumulated into totals. |