The Subscription setup for reports in REAS allows you to automatically
generate a report once an event occurs. The most common event is when
new data is made available in the application, but there are additional
events. When the specified event occurs, the report is automatically run
and delivered as defined in the subscription setup. The My
Subscriptions page allows you to view all subscriptions for all reports
currently defined for your user account.
Access points to subscribe to a report are available
from the following options:
· Shared
Reports or My Reports
· Report
Output Page
The delivery methods are as follows:
· Personal
View - this is a special run on demand subscription
that is not specific to a timed event.
· History List
- the report output is placed in your History List and is available for
your review.
· Email - the report
output is sent via email to the address specified in the subscription
setup.
· File - the report
is packaged and exported to the specified file format in the subscription
setup.
If the report being requested includes prompts (e.g.,
selection list of States, HPI historical
year and/or
period) the parameters for the prompts will be determined by the access
point for the subscription setup:
· Subscription
from Shared Reports or My Reports folders - if you are setting up a subscription
from the report option in either Shared or My Reports, the subscription
setup page will include the report prompts for you to specify the parameters
for the subscription. Once the prompts are defined, they will be used
for every scheduled run of the report. See note below on multiple subscriptions
set up or one report.
· Viewing
report output - if you are setting up a subscription while viewing report
output, the prompt parameters from your report request will be updated
to the subscription. These parameters will be used each time the subscription
is run. See note below on multiple subscriptions set up or one report.
Note: You may define as many subscriptions
for one source report as needed to specify different report prompt parameters.
The only requirement for setting up multiple subscriptions is to assign
a different name to each one. The subscription names MUST be unique. When
defining a subscription, the naming convention uses the report name and
a system date/time stamp to ensure that the auto-assigned name is unique.
Personal View Subscription Option
from Report Output Page Back to Previous
When you view the
results of a report in the Report Output page, you may manipulate elements
of the report to fit your business need (e.g., change the order of columns,
apply a view filter, change page by options among other manipulations).
Once you have the view of the output that best fits your needs, you may
save the entire report as a custom report in your company subfolder in
Shared Reports or your personal My Reports folder. Another option is to
add the current view of the report as a Personal View subscription. These
subscriptions are not run based on a scheduled event, they are run on
demand and designed to allow the layout of a shared report to be customized
for an individual.
Personal views are
useful if you have a base report available to all individuals in your
workgroup, but each individual prefers a specific layout (or view) of
the output. The difference between a
Personal View of a base report and saving it as a new report are as follows:
· Personal Views are linked to the original base report
while custom reports saved in your company folder within Shared Reports
or your personal My Reports are standalone and not linked to any other
report.
· Personal Views must have the same data elements
as the base report it is linked to while you may add or remove data elements
from your custom reports saved in your company folder within Shared Reports
or your personal My Reports and resave the report.
What is saved in the
Personal View:
· A link to the report the view is based on which defines
the report filter and the data elements included in the output (NOTE:
Although you can change the layout, you cannot remove or add any data
elements prior to defining the personal view).
· View filters applied to the output.
· Changes to Page By setup and selections.
· Changes to the layout of the output (e.g., removing
attributes or metrics off the grid but still keeping the data element
as part of the output; changes to sort order).
To set up a Personal
View,

|
After
you run a report and access the results in the Report Output page,
you may modify the layout of the report to best display the output
to meet your business needs.
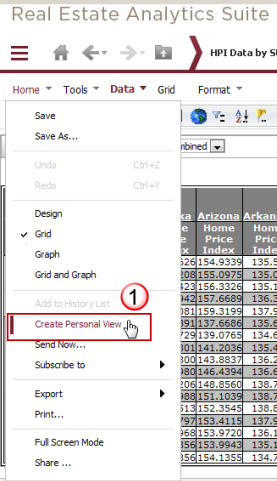
Once you get the report in the view
that best suits your needs, open the file menu and select the
Personal View option.
|
|

|
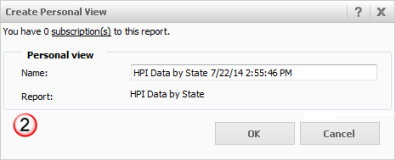
The
Create Personal View dialog is presented for you to name your
personal view of the current layout of the report.
The default name is the name of the
source report with a date and time stamp (each personal view must
have a unique name).
Update the name of the personal view
and click the OK button. |
|

|
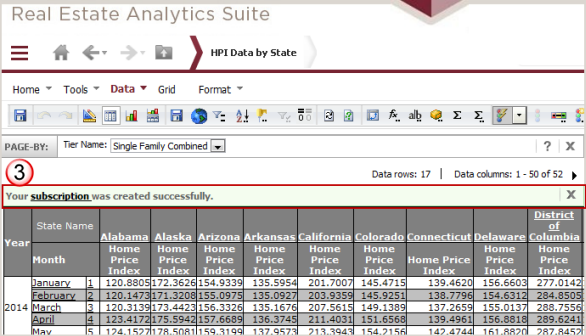
Once
you click the OK button, a notification is presented that the
Personal View has been created with a hyperlink to the Personal
View list in My Subscriptions. |
|

|
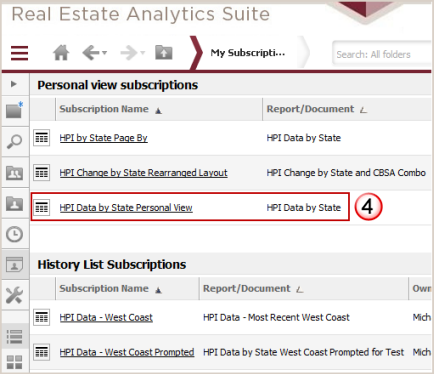
When
you click the link, your Personal Views are displayed in the My
Subscriptions page.
Each view is a hyperlink that will run
the report when clicked. |
|
Subscription Option from Shared Reports or My Reports Back
to Previous
When accessing the Shared Reports or My Reports
page, each report in the list includes an option to add a subscription.
When you select this option, the My Subscriptions page is displayed for
the selected report. From the My Subscriptions page you can select the
type of subscription you wish to define for the report.

|
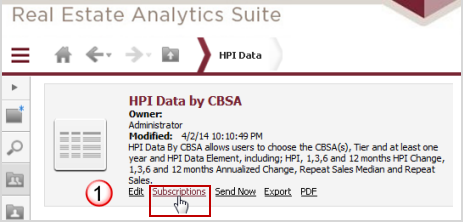
When
you access the Shared Reports or My Reports pages, each report
includes an option for Subscriptions.
When you click the option for Subscriptions,
the My Subscriptions page is presented for that individual report.
You may view the current subscriptions
defined for the selected report, edit the subscription setup or
create a new subscription.
|
|

|
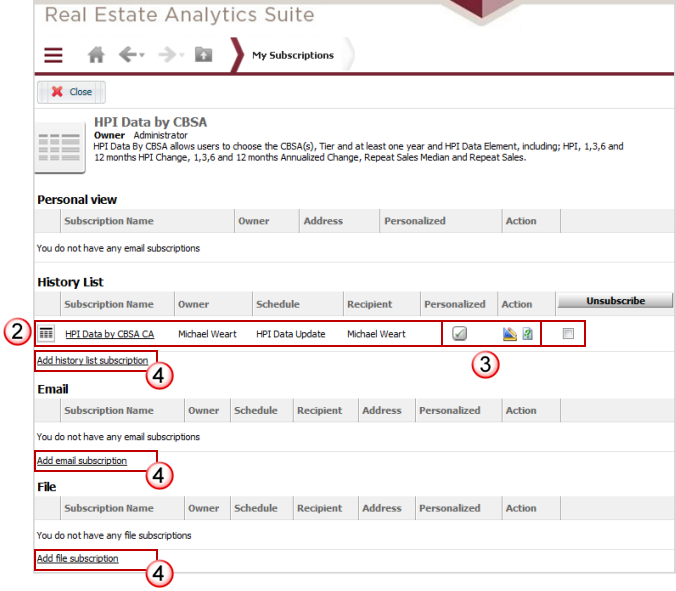
When
you click the Subscriptions option, the My Subscription page is
presented. Any subscriptions currently defined for the selected
report are displayed on this page. |
|

|
You
may edit the setup for the existing subscription.
The Personalize icon  is presented to indicate the report has additional parameters
from prompts.
The Edit icon  allows you to edit the entire subscription setup for schedule
and delivery as well as any prompt parameters required to run
the report subscription.
The Prompts icon  allows you to view and modify just the prompt parameters for the
report subscription. If the report does not include prompts, this
icon will not be displayed.
 |

|
You
may add a new subscription by clicking on the Add Subscription
option for the desired delivery method.
Note: Each subscription must have
a unique name. If you use an existing subscription name, the current
subscription will be overridden with the new setup.
Note: If the report you are defining
for the subscription includes prompts, the subscription setup
will include the prompt page for the report when selected from
this page.
Click here
for steps to output to History List.
Click here for
steps to output to Email.
Click here for
steps to output to File. |
Subscription Option from Report Output Page Back to Previous
When viewing output from the Report Output page, the
Home menu includes an option to define a subscription. If the report included
prompts to generate the output, the subscription setup will default to
the prompt selections used to generate the output to the History List.
This cannot be changed when defining the subscription, but may be changed
by accessing the My Subscriptions page and selecting the Personalize option
to modify the prompt setup.
|
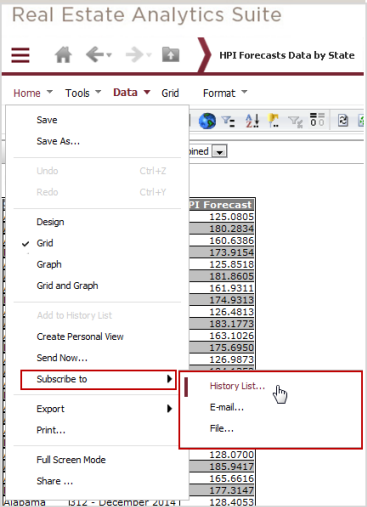
When
you access the Report Output page to view a generated report,
the Home menu includes an option to define a subscription for
the
When you click the Subscriptions option,
the Subscription Setup dialog is presented based on the target
subscription output.
Click here
for steps to output to History List.
Click here for
steps to output to Email.
Click here for
steps to output to File. |
|
Subscription Setup for Output to History List Back to Previous
When defining a subscription to History List, the report
is automatically run once the specified event occurs. The output will
be placed in your History List and, if specified, an email notification
is forwarded to the address you entered for the subscription.
The following subscription setup page is presented to
define a subscription to History List.

|
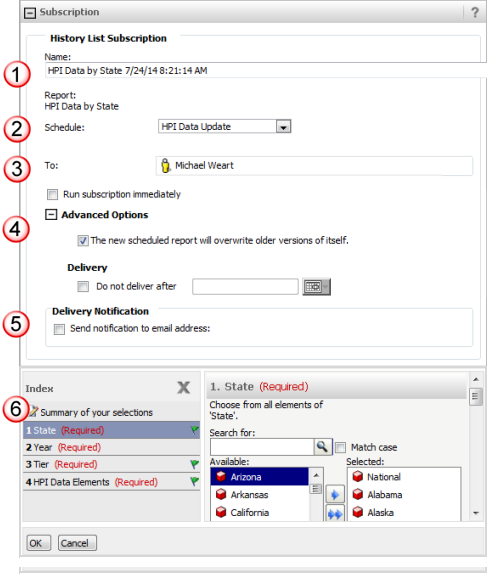
Name
and Report
You can specify the file name for the
output report. This defaults to the Report Name with a date/time
stamp, but may be changed as needed. When defining multiple subscriptions
for one report, the subscription names must be unique.
The source Report Name as it appears
in REAS is
displayed as output only.
|
|

|
Schedule
This option allows you to specify the
event that will generate the report. The options are on data update
which will run the report automatically when new data is posted. |

|
To
This option automatically inserts your
user account. This cannot be changed.
Run Subscription Immediately
When checked, the Run Subscription Immediately
option will send a preview of the report to your History List
when you click the OK button to update the subscription. |

|
Advanced
Options
You must specify if you wish to overwrite
any existing report of the same name in your History List and
the cutoff date for delivery of the subscription report.
If you check the box to overwrite older
versions of itself in the History List, when the subscription
is run (either on the scheduled event or by checking Run Subscription
Immediately), any report that was run as a subscription with the
same name will be deleted from your History List (Note: Reports
with the same name NOT run as a Subscription will NOT be deleted). |

|
Delivery
Notification
If checked, an email will be sent to
the specified address to notify you that the subscription request
was delivered to your History List. The email field is a drop
down selection list; you must define the email addresses you wish
to use in the Preferences
setup for Email Addresses. |

|
Prompts
(if applicable)
When defining a subscription from Shared
Reports or My Reports for a prompted report, the prompts are presented
for you to define the parameters for the report request.
When defining a subscription from the
Report Output page after the report is generated, the prompts
used to generate the current output are used by default for the
subscription. You may only change the prompt setup from the Personalize
option on the My Subscriptions page. |
Subscription Setup for Output to Email Back to Previous
When defining a subscription to Email, the report is
automatically run once the specified event occurs. Where the output is
placed depends on the option you specified for delivery; there are four
options as follows:
· Data
in Email - embeds/attaches the data in an email to the specified address
with NO output to History List
· Data
in Email and to History List - embeds/attaches the data in an email to
the specified address AND outputs to History List
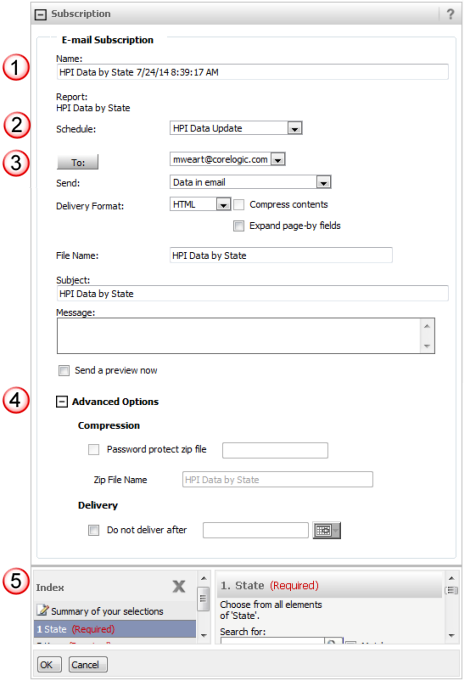
The following subscription setup page is presented to
define a subscription to Email:

|
Name
and Report
You can specify the file name for the
subscription report. This defaults to the Report Name with a date/time
stamp, but may be changed as needed. When defining multiple subscriptions
for one report, the subscription names must be unique.
The source Report Name as it appears
in REAS is
displayed as output only.

|
|

|
Schedule
This option allows you to specify the
event that will generate the report. The options are on data update
which will run the report automatically when new data is posted. |

|
Email
Setup Details
To - this option specifies the email
address to receive the subscription delivery and provides a selection
list for the emails defined in your Preferences.
Send - this option allows you to specify
the option for delivering the data (see list of options above).
Delivery Format - this option allows
you to specify the file format for the data in the email. If you
select a file format other than HTML, the compression option is
enabled and, if selected, the Advanced Options allows you to specify
the zip file details.
File Name - if you select a delivery
format other than HTML, you may specify the File Name used to
contain the output data.
Subject and Message - allows you to
customize the subject and the message text for the email that
is sent for the delivery.
Send a Preview Now - when checked, this
option will send a preview of the report via email when you click
the OK button to update the subscription. |
|

|
Advanced
Options
Compression options are disabled if
the format is HTML or you have not selected the Compress Contents
option in the Delivery Format setup. If you are compressing
the output, these options allow you to specify a password to open
the ZIP file and assign a name to the ZIP file that is created.
You may also specify a cutoff
date for the delivery. |

|
Prompts
(if applicable)
When defining a subscription from Shared
Reports or My Reports for a prompted report, the prompts are presented
for you to define the parameters for the report request.
When defining a subscription from the
Report Output page after the report is generated, the prompts
used to generate the current output are used by default for the
subscription. You may only change the prompt setup from the Personalize
option on the My Subscriptions page. |
Subscription Setup for Output to File Back
to Previous
When defining a subscription to File, the report
is automatically run once the specified event occurs. The output is placed
on the FTP server for your user account and, if enabled, an email is sent
to the specified address with a link to the FTP server. The file format
for the export is defined in the subscription and may be one of the following:
· HTML
- output is formatted in an HTML page
· PDF
- output is formatted in a PDF file
· Excel
- output is formatted in an Excel file
· Plain
Text - output is formatted in a standard text file
· CSV
- output is formatted in a text file with comma separate values
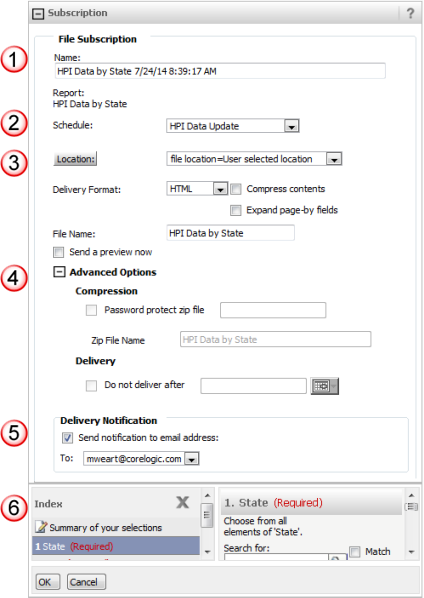
The following subscription setup page is presented
to define a subscription to File:

|
Subscription
Name and Report
You can specify the file name
for the subscription report. This defaults to the Report Name
with a date/time stamp, but may be changed as needed. When defining
multiple subscriptions for one report, the subscription names
must be unique.
This field is not presented
when you select the Send Now option for delivery.
The source Report Name as it appears
in REAS is
displayed as output only.

|
|

|
Schedule
This option allows you to specify
the event that will generate the report. The options for running
the subscription allow you to specify on data update or Send Now
which will run the subscription on demand this one time.
Note: If you select Send Now,
the subscription is run immediately and not retained. If you access
an existing subscription that is set up to run for data update
and change it to Send Now, the existing subscription will
be deleted after it is run.
When something other than Send
Now is selected, there is a Send Preview Now checkbox that will
send a preview of the report via the delivery method (e.g., email,
file, History List) when you click OK to update the subscription. |
|

|
Location
and Delivery Format
Location - this option identifies
the location for delivery; the location is hard coded to the FTP
site for REAS
and cannot be modified.
Delivery Format - allows you to
specify the format of the output file from the drop down list.
You may also compress the contents of the file into a ZIP file
and Expand Page By Fields.
Expanding the Page By fields allows
you to extract the entire output dataset. If you do not expand
the Page By, the output will only include the default Page By
selections. If you do expand the Page By, the output will include
all combinations of Page By values. When expanding the Page By
with Excel as the output, you will also be prompted to specify
if each "page" of your output is to be placed on separate
worksheets within the Excel file.
File Name allows you to define
the name of the file that is delivered. This defaults to the report
name with the system date/time stamp to keep the name unique.
You may change the delivery file name as needed.
If you have selected any delivery
method other than Send Now, you will see the Send a Preview Now
checkbox under the File Name. When checked, a preview of the report
is sent via the specified delivery method when you click the OK
button . |

|
Advanced
Options
Compression options are disabled if
you have not selected the Compress Contents option. If you are
compressing the output, these options allow you to specify a password
to open the ZIP file and assign a name to the ZIP file that is
created.
You may also specify a cutoff
date for the delivery. |

|
Delivery
Notification
You may request an email notification
when the report is generated and placed in your History List.
You may select from the list of email accounts set up in your
Preferences or add a new email to your list of accounts from the
Send to a New Address hyperlink. |

|
Prompts
(if applicable)
When defining a subscription from Shared
Reports or My Reports for a prompted report, the prompts are presented
for you to define the parameters for the report request.
When defining a subscription from the
Report Output page after the report is generated, the prompts
used to generate the current output are used by default for the
subscription. You may only change the prompt setup from the Personalize
option on the My Subscriptions page. |
![]()

![]()

![]()

![]()


