Filtering allows you to define the conditions required
for a data record (e.g., loan, HPI by geography, etc) must meet to be
included in your report output. You may define as many conditions as necessary
to filter your data. There are two types of filters for a report as follows:
· Report Filter is applied to the source
data to generate the initial output when a report is executed.
· View Filter is applied after the output
is generated and allows you to isolate data from within that output dataset
to create a customized view and hide those records in the output dataset
that do not meet the filter conditions.
The mechanics of defining a report filter condition
or view filter condition are identical with one exception; report filter
conditions may use any attribute or metric while a view filter condition
can only use the attributes and metrics that are included in the output
dataset you are working with.
This topic will provide the following information:
· How to define filter conditions
· Comparison
operators used for filtering
· Join operators
used to link filter conditions
· Creating and Using
Predefined Filters
The user interface to define a report or view filter
is the same. The report filter can only be defined prior to running a
report and can use any attribute or metric, a view filter can only be
defined after running a report and is limited to those attributes and
metrics that are included in the output dataset. This example will show
the user interface when defining a report filter, but the setup for a
view filter is identical.
There are two types of filter conditions as follows;
each of these two filter types have different setup options:
· Qualify filter
on Attribute allows you to compare the value of an attribute form
to a specified target value using an operator (e.g., Equal To, Greater
Than, Between, etc) that determines the records to be included or excluded
from your output. Click
here for more information on Attribute Forms.
· Qualify filter on Metric allows you
to compare the value of a metric to a specified target value using an
operator (e.g., Equal To, Greater Than, Between, etc) that determines
the records to be included or excluded from your output.
· Select filter on
an attribute allows you to specify a list of values that are either
to be included (In List) or excluded (Not In List) and is limited to attributes
that have coded values (e.g., attributes such as State or Delinquency
Status); metrics are not eligible for the Select filter type.
Qualify Filter Condition Setup for Attribute Back to Previous
Due to the nature of the ID form and the system resource
required for the DESC form of an attribute, an Attribute Qualification
condition is only applicable for those attributes whose value is the same
as the ID. The attributes in REAS
available for a qualification filter are as follows:
· Data Period – ID is the same as the sequentially numbered
CoreLogic assigned data period • CBSA – ID is the same as the government
assigned numeric code for each CBSA.
· County – ID is the same as the government assigned
numeric FIPS code for each county.
Note:
The FIPS Code attribute has only the FIPS (ID is renamed to FIPS) and
matches the FIPS assigned to each county.
· CBSA Code or CBSA Name - ID is the same as the government
assigned numeric CBSA code for each CBSA location..
· Zip – ID is the same as the government assigned numeric
code for each zip code area.
· Month - ID is the same as the numeric value for each
month in the year..
· Bedrooms – ID is the same as the number
of bedrooms designated for a property.
For any other attribute available in REAS, there is no correlation
between the ID form value and the value that you will need for reporting
and it is highly recommended that you use an Attribute Selection condition.
This will allow you to select the individual values for the filter condition
to be included or omitted from your output.
To define a Qualify filter condition for one of the
above listed attributes using the Attribute Form, follow the steps below:
Note: You should only use this
option to filter on attributes whose ID value is known (e.g., Data Period
or Origination Year where the ID is the actual value of the attribute).
Click here for
more information on Attribute Forms.

|
Move
the attribute to the Filter panel
You may move an attribute or metric
to the Filter panel by either drag and drop or right-click
popup menu. The State attribute will be used for this example. |
|

|
Specify
the Type of condition
For this example, the Qualify option
will be used for the CBSA Code attribute.
Note: When the Type of condition
is Qualify and an attribute is selected, the attribute form field
is enabled for selection. You should always use the ID form when
comparing for filter conditions. Click
here for more information on Attribute Forms

|

Note: The prompting of the
qualification on this type of filter condition is not very intuitive
and is not recommended. Prompting for the value is more intuitive
but provides no list of values for selection and, for that reason,
is not recommended.
The best implementation of the
prompts for a filter condition on an attribute are the element
prompts for the Select Filter setup on an Attribute. That type
of prompt has the attribute preselected with a list of values
for selection. With this type of prompting, you select the values
you wish to include or omit from the list. As noted above, the
value prompt from a Qualify Filter on an attribute only provides
a blank entry field for you to specify the value without a list
to select from. |

|
Specify
the Comparison Operator or define as a Prompt
The list of available operators
will be determined by the Type of condition and the Form of the
attribute. For a Qualify condition, the operators compare the
loan record value to against the value defined for the condition.
Refer to the Comparison
Operators section for a list and description of the operators.
If you wish the attribute selection
and value to be prompted, click the  Prompt
icon button. The condition setup will close and the condition
will be displayed with the text "Qualification on.."
with the name of the attribute. When you run a report with a prompted
filter element, a prompt will be displayed to select the values
for the filter. Prompt
icon button. The condition setup will close and the condition
will be displayed with the text "Qualification on.."
with the name of the attribute. When you run a report with a prompted
filter element, a prompt will be displayed to select the values
for the filter. |

|
Specify
the value(s) for the condition
Enter the value you wish to use
as a comparison against the source data. If the comparison operator
allows for multiple values, separate each value with a
The value(s) specified are combined
with the Comparison Operator to determine if an individual data
record is included in the output.
If you wish the just the filtering
value to be prompted, click the  Prompt icon
button to the right of the value. The condition will prompt you
for a value each time the report is executed. Prompt icon
button to the right of the value. The condition will prompt you
for a value each time the report is executed. |

|
Once
your condition is fully defined click the Apply button to update
the condition for the filter. The Cancel button allows you to
cancel the condition and clear it from the Filter panel.
Note: Depending on where you have
accessed the filtering option, the Apply button may appear as
a Check icon button and the Cancel button may appear as an X icon
button. |
|

|
The
Filter panel displays the new condition.
As you add additional conditions,
the join operator is automatically populated with AND.
You may change the relationship
of the conditions by selecting a new join operator.
Refer to the Join
Operators section for more information on the operators and
how conditions are joined. |

|
|
If
you have specified the prompt option for the Qualify selection,
the condition will display the text "Qualification on..."
with the name of the attribute used for the condition (in this
case State).
With this type of prompted condition,
you specify the comparison operator and the value. |

|
|
If
you have specified the prompt option for the Value selection,
the condition will display the text "Equals CBSA Code Value"
and you will be prompted for a value each time the report is requested.
With this type of prompted condition,
you specify the value. |

|
|
Repeat
steps 1 through 6 for each filter condition you wish to add. |
|
Qualify Filter Condition Setup on Metric Back to Previous

|
Move
the attribute/metric to the Filter panel
You may move an attribute or metric
to the Filter panel by either drag and drop or right-click
popup menu. The State attribute will be used for this example.
Note: Metrics are only allowed
to be used in Qualify Filter conditions so there is no parameter
for the Type of condition.

|

Note: The prompting
of the comparison opeartor for this type of filter condition is
not very intuitive and is not recommended. Prompting for the value
is more intuitive.
The best implementation of the
prompts for a Qualify filter condition on a metric is the value
prompt. That type of prompt has the metric preselected with an
entry field to specify the comparison value. |

|
Specify
the Comparison Operator or define as a Prompt
The list of available operators
will be determined by the Type of condition and the Form of the
attribute. For a Qualify condition, the operators compare the
loan record value to against the value defined for the condition.
Refer to the Comparison
Operators section for a list and description of the operators.
If you wish the filter condition
to be a prompted, click the  Prompt icon button. The condition setup will close and the
condition will be displayed with the text "Qualification
on.." with the name of the attribute. When you run a report
with a prompted filter element, a prompt will be displayed to
select the values for the filter.
 |

|
Specify
the value(s) for the condition
This is a free format entry field.
The metric value(s) specified are combined with the Comparison
Operator to determine if an individual data record is included
in the output.
Note:
When entering values for percentages, enter the value as
a decimal (e.g., in the example the comparison value is 6% for
1 Month HPI Change and is entered as 0.06 rather than 6%).
If you wish
the just the filtering value to be prompted, click the  Prompt icon button to the right of the
value. The condition will prompt you for a value each time the
report is executed. Prompt icon button to the right of the
value. The condition will prompt you for a value each time the
report is executed. |

|
Apply
button to update the condition for the filter. The Cancel
button allows you to cancel the condition and clear it from the
Filter panel.
Note: Depending on where you have
accessed the filtering option, the Apply button may appear as
a Check icon button and the Cancel button may appear as an X icon
button. |
|

|
The
Filter panel displays the new condition.
As you add additional conditions,
the join operator is automatically populated with AND.
You may change the relationship
of the conditions by selecting a new join operator.
Refer to the Join
Operators section for more information on the operators and
how conditions are joined. |

|
|
If
you have selected the prompt option for the comparison operator,
the condition will display the text "Qualification on..."
with the name of the metric used for the condition (in this case
State).
For this, you specify the comparison
operator and the value for the filter condition. |

|
|
If
you have selected the prompt option for the value, the condition
will display the text "[metric name] Value" where the
value would normally be displayed.
For this, you specify the value
only for the filter condition. |

|
|
Repeat
steps 1 through 5 for each filter condition you wish to add. |
|
To define a Select filter condition for an attribute,
follow the steps below:

|
Move
the attribute to the Filter panel
You may move an attribute to the
Filter panel by either drag and drop or right-click popup menu.
The right click menu includes an option to Add to Filter.
The State attribute will be used
for this example. |
|

|
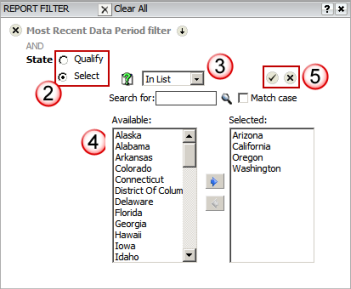
Specify
the Type of condition
For this example, the Select option
will be used for the State attribute.
Note: When the Type of condition
is Select, the attribute form field is not enabled for selection
as the application determines the form to display the valid codes.

|
|

|
Specify
the Comparison Operator or define as a Prompt
The list of available operators
will be determined by the Type of condition and the Form of the
attribute. For a Select condition, the operators specify if the
selected values are included (i.e., In List) or excluded (i.e..,
Not In List). Refer to the Comparison
Operators section for a list and description of the operators.
If you wish the list of elements
for the selected attribute to be a prompted, click the  Prompt icon button. The condition setup will
close and the condition will be displayed with the text "Elements
of.." with the name of the attribute. When you run a report
with a prompted filter element, a prompt will be displayed to
select the values of the attribute that you wish to use for the
filter. Prompt icon button. The condition setup will
close and the condition will be displayed with the text "Elements
of.." with the name of the attribute. When you run a report
with a prompted filter element, a prompt will be displayed to
select the values of the attribute that you wish to use for the
filter. |

|
Specify
the value(s) for the condition
On the Select type condition, the
values for the coded field are presented in the Available list
box. The Description form for the selected attribute is
used (the internal filter processing will actually use
the ID in the background).
Move the values you wish to include
(when operator is In List) or omit (when the operator is Not In
List) in the output from the Available to the Selected list box.
The standard Windows CTL and click
or click, SHIFT and click processing will allow you to select
multiple values to be moved. You may freely move values between
the Available and Selected list boxes.
The values selected are combined
with the Comparison Operator to determine if an individual loan
record is included in the output. |

|
Once
your condition is fully defined click the Check icon to update
the condition for the filter. The X icon allows you to cancel
the condition and clear it from the Filter panel. |
|

|
The
Filter panel displays the new condition.
As you add additional conditions,
the join operator is automatically populated with AND.
You may change the relationship
of the conditions by selecting a new join operator.
Refer to the Join
Operators section for more information on the operators and
how conditions are joined.. |

|
|
If
the filter condition was prompted rather than having the values
selected, the condition will display the text "Elements of..."
with the name of the attribute used for the condition (in this
case State).
With this type of prompt, you select
from a list of values. |

|
|
Repeat
steps 1 through 6 for each filter condition you wish to add. |
|
Comparison Operators for Filter Conditions Back
to Previous
There are three types of filter conditions as follows:
· Metric
Qualify Filter condition - you define a value to compare to the value
of the metric
· Attribute
Qualify Filter condition - you define a value to compare to the ID or
Description form of the attribute
· Attribute
Selection Filter condition - you define a set of values from a selection
list to compare to the attribute
Operators available for selection when defining a SELECT
filter condition:
Operator |
Enter |
Attributes |
Metrics |
In
List |
Select from a list of values |
Yes |
Yes |
Not
In List |
Select from a list of values |
Yes |
Yes |
Operators available for selection when defining a QUALIFY
filter condition:
Operator |
Enter |
Attributes |
Metrics |
Equal
To |
Value |
Yes |
Yes |
Not
Equal To |
Value |
Yes |
Yes |
Greater
Than |
Value |
Yes |
Yes |
Greater
Than or Equal To |
Value |
Yes |
Yes |
Less
Than |
Value |
Yes |
Yes |
Less
Than or Equal To |
Value |
Yes |
Yes |
Between |
Start and End Values |
Yes |
Yes |
Not
Between |
Start and End Values |
Yes |
Yes |
Contains |
Value |
Yes |
No |
Does
not Contain |
Value |
Yes |
No |
Begins
With |
Value |
Yes |
No |
Does
Not Begin With |
Value |
Yes |
No |
Ends
With |
Value |
Yes |
No |
Does
Not End With |
Value |
Yes |
No |
Like |
Value |
Yes |
No |
Not
Like |
Value |
Yes |
No |
Is
NULL |
(Not Applicable) |
Yes |
Yes |
Is
Not NULL |
(Not Applicable) |
Yes |
Yes |
In |
List of Values |
Yes |
Yes |
Not
In |
List of Values |
Yes |
Yes |
Highest |
Number |
No |
Yes |
Lowest |
Number |
No |
Yes |
Highest
% |
Number |
No |
Yes |
Lowest
% |
Number |
No |
Yes |
A filter condition may be comprised of one line item
(e.g., Data Period equal to 271), multiple line items which form a "compound"
filter condition, or a set of conditions
saved in a standalone filter object that is then added to the report.
A standalone filter object has predefined conditions
saved outside of the report setup and available to add to any report or
view filter setup. The most commonly used predefined filter is the Most
Recent Data Period defined within REAS.
This filter object contains the period ID for the most recent period of
data; the period number is updated by the System Administrator whenever
new data is posted to REAS.
Once you add the Most Recent Data Period filter to a report, it will automatically
return records for the period number defined for this filter. You may
configure your own predefined filter object for those filter conditions
you regularly apply to your custom reports (e.g., if you do analysis on
specific states every month, you can define a filter object to identify
the list of states you always include on reports).
The join operators and the indention of the conditions
are used to determine the type of application and the grouping of conditions.
The following join operators are available for selection:
Operator |
Application |
AND |
Match both conditions |
OR |
Match either condition |
AND
NOT |
Match the first condition but
not the second condition |
OR
NOT |
Match only one of the first and
second conditions |
Compound filters are multiple conditions that are combined
to form a filter that is evaluated as one entity. You can join conditions
based on the operator between conditions (AND, OR, AND NOT, OR NOT) and
indenting conditions to a lower level of application. An example of conditions
illustrates how they are applied.
Note: The following example is
for demonstration purposes only and was created in Vector Securities and
may not reflect the data elements available in the web-based CoreLogic
application you are currently accessing.
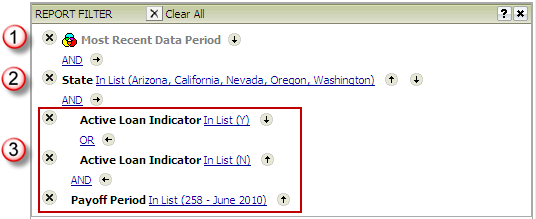
In this example, there are three filter conditions;
the third condition is a "compound" filter condition that has
multiple conditions joined to act as one condition. With the AND operator
linking the first two conditions and the third compound condition, each
of the three conditions must evaluate to TRUE for a loan record to be
included in the output. The report results would provide the following
data:
Report Filter
Condition Evaluation |

|
Data must be equal to the Most Recent
Data Period (currently Period 258) |

|
State for the loan must be either
AZ, CA, NV, OR or WA |

|
The loan must be EITHER
An active loan (Active Loan Indicator
= "Y")
OR
An inactive loan (Active Loan Indicator
= "N") AND
Have a Payoff Period equal to Period
258 (Most Recent Data Period) |
REAS
provides a set of predefined filters that may be used for report filtering
(these are not available for selection when defining a view filter). There
are data period filters that automatically advance the data period being
returned based on the most recent data period available for reporting.
In addition to the set of filters provided in REAS, you may also create your
own predefined filters for commonly used conditions that are applied to
your custom reports. While most typical filters contain a single condition,
there is no limit to the conditions you may add to a predefined filter.
By creating a standalone filter, you can eliminate entering the same conditions
into custom reports and also globally change a filter for a number of
reports at one time. When you modify the conditions in the predefined
filter, any reports that use that filter will automatically be updated
with the new conditions and the next time the report is run will return
results based on the current setup. This eliminates the need to access
and change each individual report.
These filters may be added to the Report Filter when
creating a new, or editing an existing report. The following are some
examples of the predefined filters provided in REAS
related to data periods:
Predefined Filters |
Most Recent Data Period |
Returns the data based on the most
recent period updated to REAS. |
Most Recent 6 Data Periods |
Returns data based on the most recent
6 data periods updated to REAS. |
To define your own filter object, follow the steps below:

|
Access
Design Mode (either from Create Report or from a current report)
This is typically used to create
a full report, but once you define the filter conditions, you
may save just the filter conditions to a standalone filter object.

|
|

|
Define
the filter conditions
Add as many conditions as needed
for the predefined filter. When adding more than one condition,
make sure your join operator accurately links the conditions.
Refer to the steps to define a
Qualify
Filter on an Attribute, Qualify
Filter on a Metric or Select filter
on an Attribute condition.
Refer to the Join
Operators for more information on how to join multiple conditions.
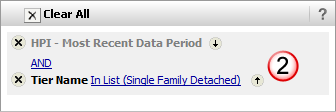
For this example, the filter will
limit records to the Most Recent Data Period and e
Single Family
Detached tier. |
|

|
Select
the Save option
Once you have defined all conditions
relevant for your standalone filter object, select the Save As
option to access the Save dialog. |

|

|
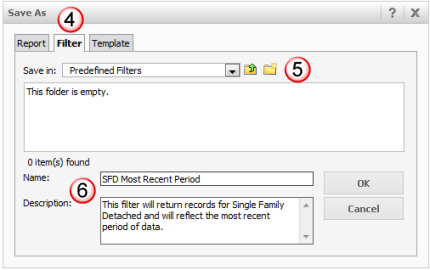
Select
the Filter tab from the Save dialog
If this filter was defined via
the Create Report option, you can still save it as a filter, but
you must select the Filter tab. By selecting the Filter tab, the
save operation will only save the filter conditions and any grid/graph
layout is ignored on the save.
If this filter was defined from
the Create Filter option, the Save dialog will not have any tabs
as it is based on the page you were accessing when the Save button
was clicked.
|
|

|
Select
the Folder location to save the new filter
You may select the folder from
the drop down list of available folders and create a new subfolder
if needed. If this filter is to be shared with all members of
your user group, save the filter in your company shared folder
in Shared Reports. If this filter is for your use only, save the
filter in My Reports of a subfolder within My Reports. |

|
Enter
the Name and Description for the new filter
It is recommended that you
add a description that identifies the conditions of the filter.
Once complete, click the OK button to save the new filter in the
specified location. |
|
|
|
Repeat
steps 1 through 6 for each predefined filter you wish to define. |
|

|
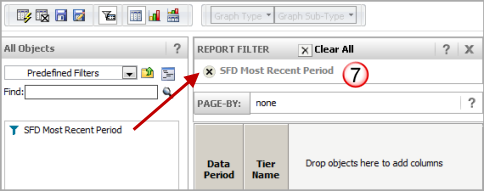
To
use the predefined (standalone) filter on reports, access the
folder location of the filter in the Object Browser and move
the filter into the Report Filter panel. |
|
![]()
![]()
![]()

![]()
![]() Prompt
icon button. The condition setup will close and the condition
will be displayed with the text "Qualification on.."
with the name of the attribute. When you run a report with a prompted
filter element, a prompt will be displayed to select the values
for the filter.
Prompt
icon button. The condition setup will close and the condition
will be displayed with the text "Qualification on.."
with the name of the attribute. When you run a report with a prompted
filter element, a prompt will be displayed to select the values
for the filter.![]()
![]() Prompt icon
button to the right of the value. The condition will prompt you
for a value each time the report is executed.
Prompt icon
button to the right of the value. The condition will prompt you
for a value each time the report is executed.![]()
![]()


